AS014 Reset & Teardown (FCC ID 2AKIT-AS014)
Factory reset and internal photos for Aqara (Lumi United) AS014. Aqara Zigbee smart plug.
January 15, 2026
•
9 read
Before you buy the Aqara (Lumi United) AS014, check what's inside.
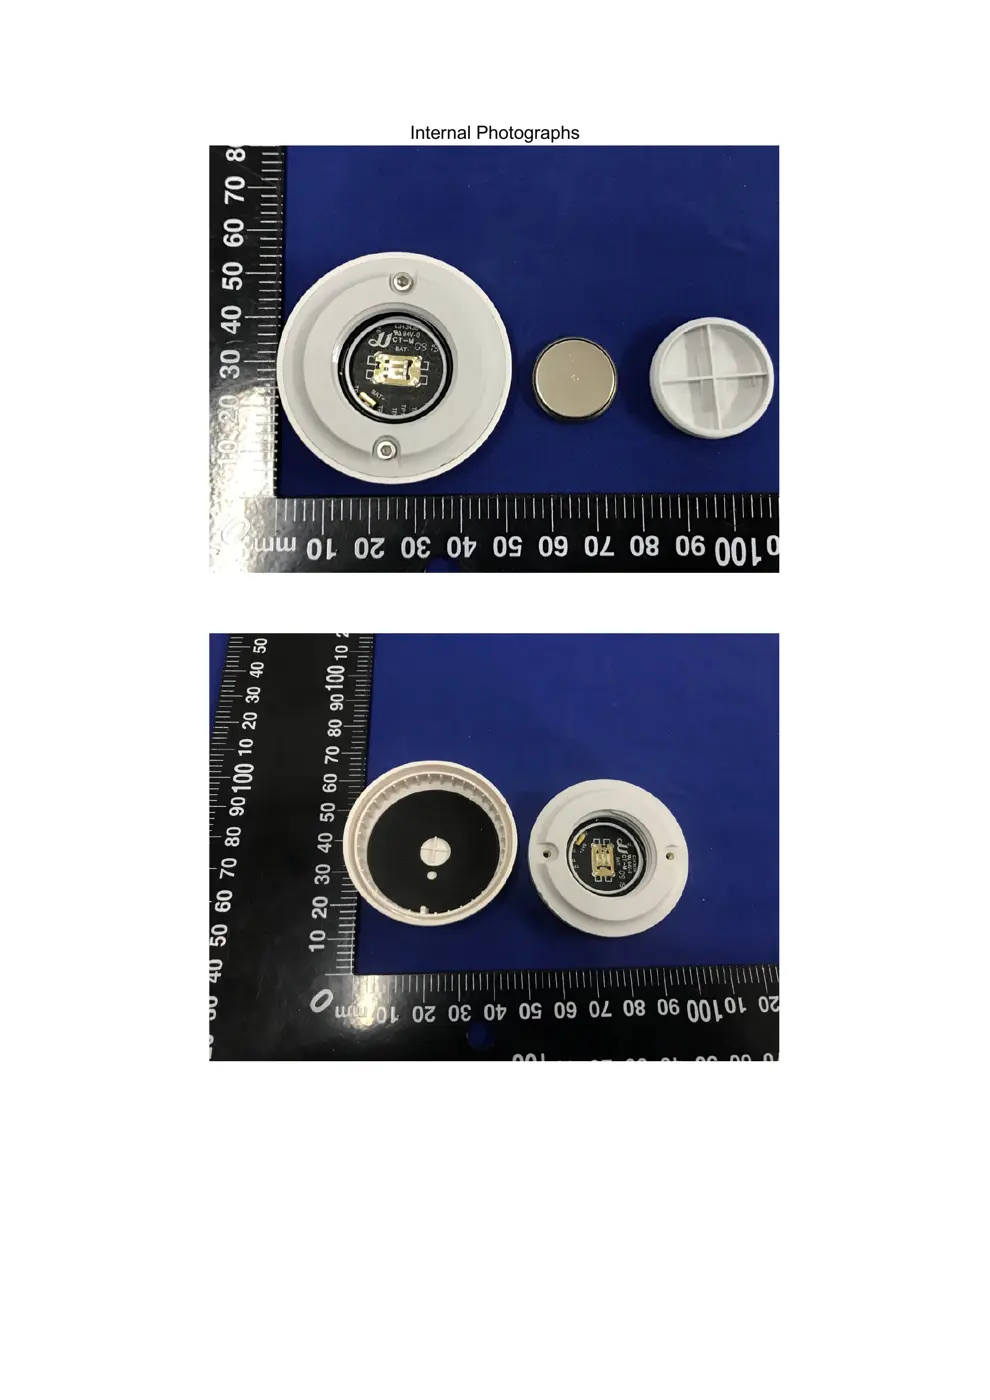
This is the Aqara Water Leak Sensor T1 (Model AS014/WLS-S01), a battery-powered Zigbee 3.0 device designed to detect water ingress. It requires a compatible Zigbee hub for operation and offers features like an indicator light and reset button for network pairing and range testing.
⚠️ NOTE: Ensure correct battery polarity when replacing the CR2032 battery.
Quick Specs
- Manufacturer: Aqara (Lumi United)
- Model: AS014
- Protocol: Zigbee
- Chipset: Zigbee SoC
- Ecosystem: Aqara Zigbee
- App: Aqara Home
🔧 Geek Corner (Flashing Info)
- Chipset: Unknown
- Flashable: ❌ No
- Info: Proprietary Zigbee SoC, not designed for flashing custom firmware like Tasmota.
User Manual
Scanned pages from the official user manual:

External Photos
Photos of the device exterior:

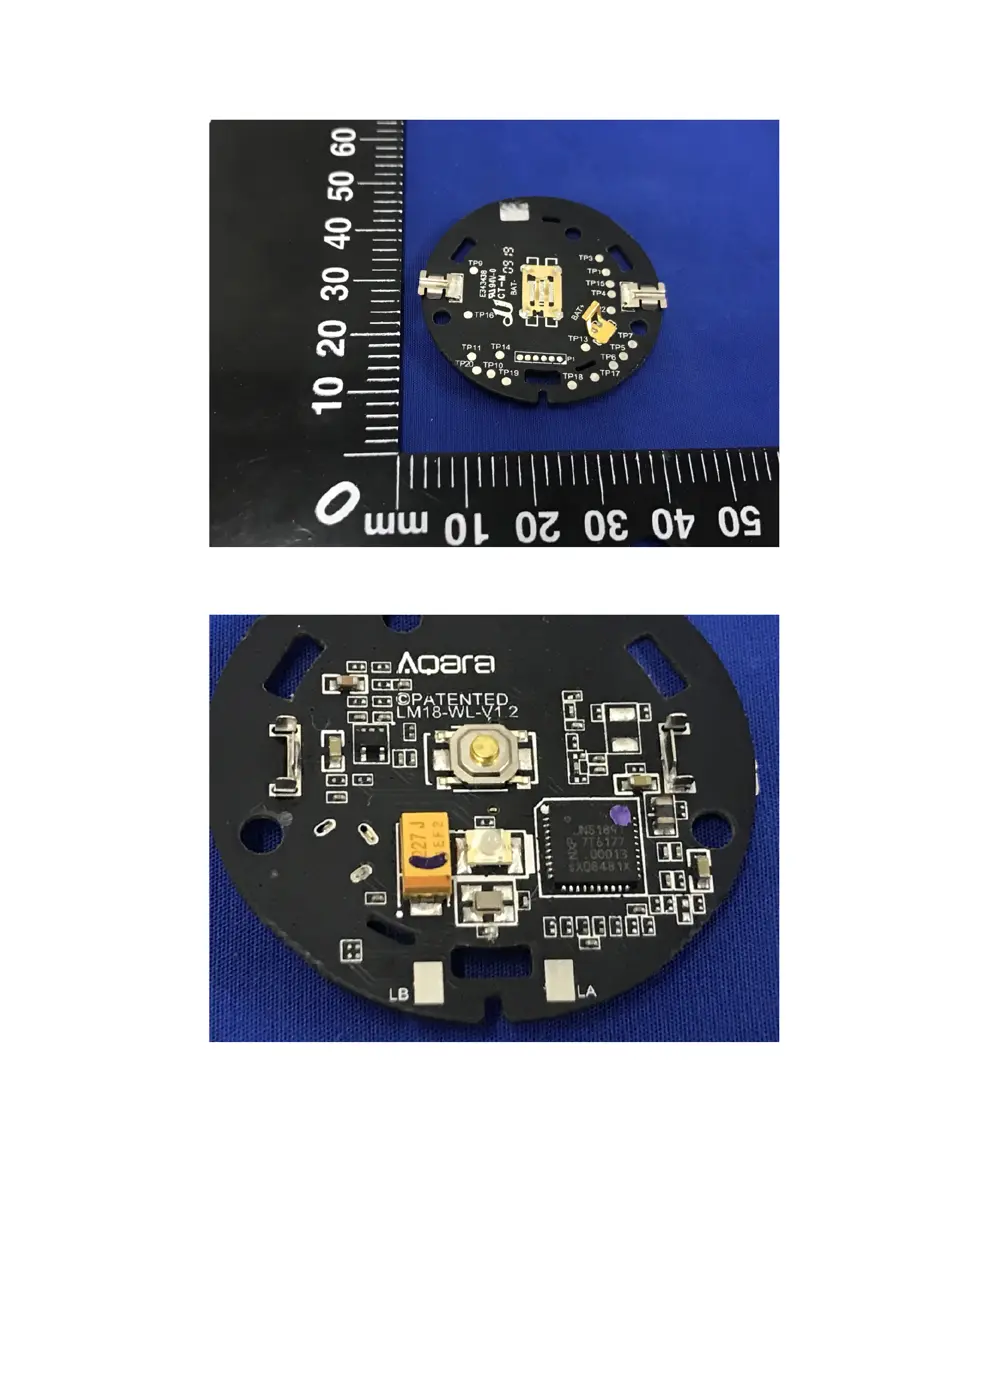
Internal Photos
Teardown photos showing the PCB and components:


Verdict
The AS014 is a Zigbee device from the Aqara Zigbee ecosystem.
📄 Click to view full text manual (SEO)
Water Leak Sensor T1
English
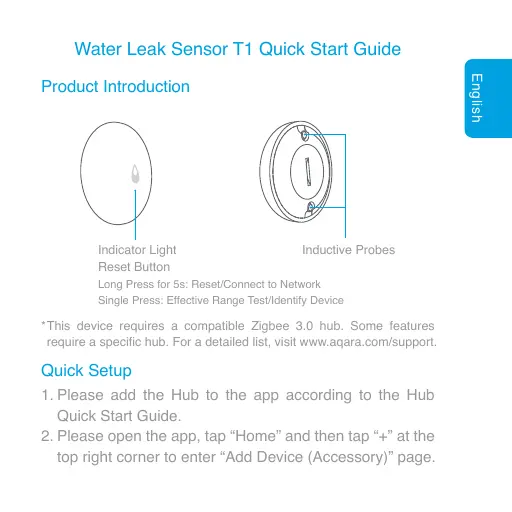
Water Leak Sensor T1 Quick Start Guide
Inductive ProbesIndicator Light
Reset Button
Long Press for 5s: Reset/Connect to Network
Single Press: Effective Range Test/Identify Device
Product Introduction
Quick Setup
This device requires a compatible Zigbee 3.0 hub. Some features
require a specific hub. For a detailed list, visit www.aqara.com/support.
*
Please add the Hub to the app according to the Hub
Quick Start Guide.
Please open the app, tap “Home” and then tap “+” at the
top right corner to enter “Add Device (Accessory)” page.
1.
2.
EnglishIf the connection fails, please move the device closer to the Hub and try
again.
*
Avoid metal surface to maximize signal strength.*
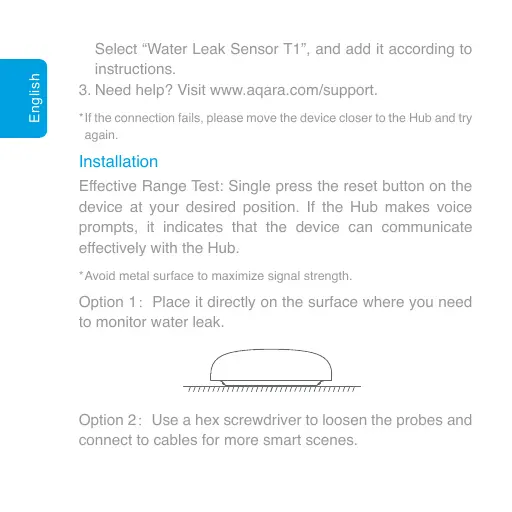
Installation
Effective Range Test: Single press the reset button on the
device at your desired position. If the Hub makes voice
prompts, it indicates that the device can communicate
effectively with the Hub.
Option 1ğPlace it directly on the surface where you need
to monitor water leak.
Option 2ğUse a hex screwdriver to loosen the probes and
connect to cables for more smart scenes.
3.
Select “Water Leak Sensor T1”, and add it according to
instructions.
Need help? Visit www.aqara.com/support.
English
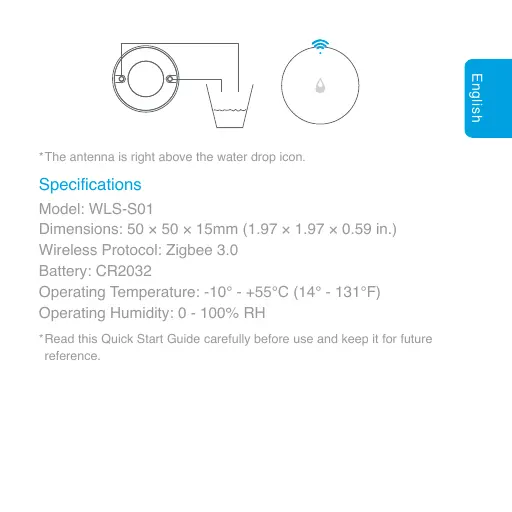
The antenna is right above the water drop icon.*
Read this Quick Start Guide carefully before use and keep it for future
reference.
*
Specifications
Model: WLS-S01
Dimensions: 50 × 50 × 15mm (1.97 × 1.97 × 0.59 in.)
Wireless Protocol: Zigbee 3.0
Battery: CR2032
Operating Temperature: -10° - +55℃ (14° - 131℉)
Operating Humidity: 0 - 100% RH
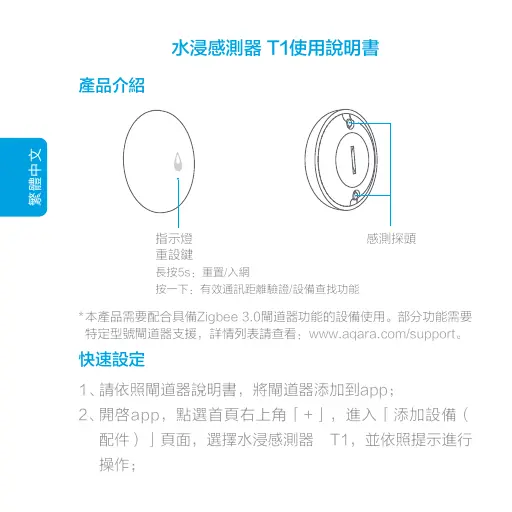
水浸感測器 T1使用說明書
產品介紹
快速設定
*本產品需要配合具備Zigbee 3.0閘道器功能的設備使用。部分功能需要
特定型號閘道器支援,詳情列表請查看:www.aqara.com/support。
感測探頭指示燈
重設鍵
長按5s:重置/入網
按一下:有效通訊距離驗證/設備查找功能
繁體中文
1、
2、
請依照閘道器說明書,將閘道器添加到app;
開啓app,點選首頁右上角「+」,進入「添加設備(
配件)」頁面,選擇水浸感測器 T1,並依照提示進行
操作;
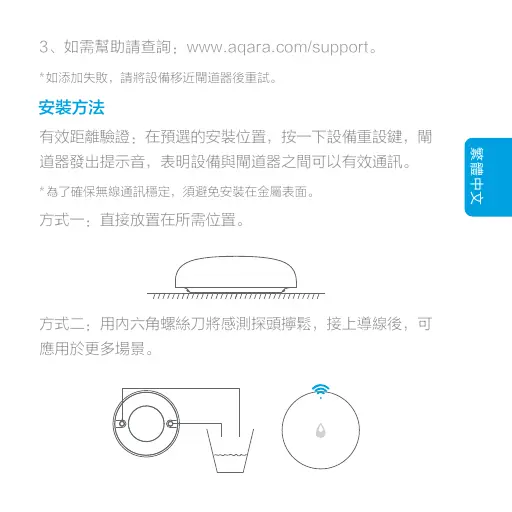
*如添加失敗,請將設備移近閘道器後重試。
*為了確保無線通訊穩定,須避免安裝在金屬表面。
繁體中文
安裝方法
有效距離驗證:在預選的安裝位置,按一下設備重設鍵,閘
道器發出提示音,表明設備與閘道器之間可以有效通訊。
方式一:直接放置在所需位置。
方式二:用內六角螺絲刀將感測探頭擰鬆,接上導線後,可
應用於更多場景。
3、如需幫助請查詢:www.aqara.com/support。
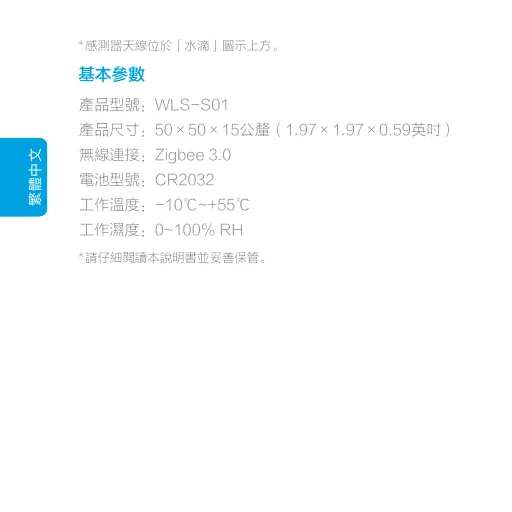
*感測器天線位於「水滴」圖示上方。
*請仔細閱讀本說明書並妥善保管。
繁體中文
基本參數
產品型號:WLS-S01
產品尺寸:50×50×15公釐(1.97×1.97×0.59英吋)
無線連接:Zigbee 3.0
電池型號:CR2032
工作溫度:-10℃~+55℃
工作濕度:0~100% RH
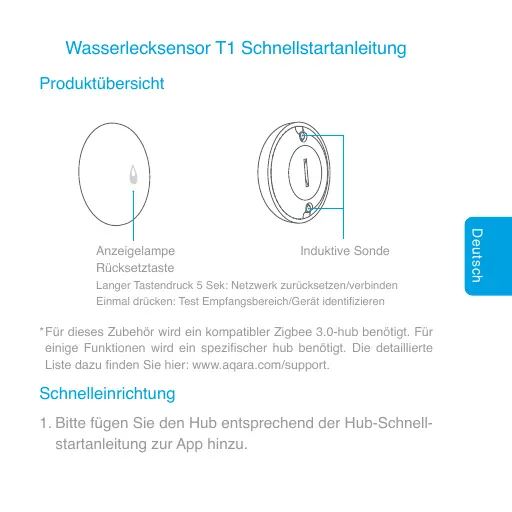
Wasserlecksensor T1 Schnellstartanleitung
Produktübersicht
Schnelleinrichtung
Deutsch
Induktive SondeAnzeigelampe
Rücksetztaste
Langer Tastendruck 5 Sek: Netzwerk zurücksetzen/verbinden
Einmal drücken: Test Empfangsbereich/Gerät identifizieren
Für dieses Zubehör wird ein kompatibler Zigbee 3.0-hub benötigt. Für
einige Funktionen wird ein spezifischer hub benötigt. Die detaillierte
Liste dazu finden Sie hier: www.aqara.com/support.
*
Bitte fügen Sie den Hub entsprechend der Hub-Schnell-
startanleitung zur App hinzu.
1.
Deutsch
Wenn die Verbindung fehlschlägt, geben Sie bitte das Zubehör näher
an den Hub und versuchen Sie es erneut.
*
Vermeiden Sie die Nähe von Metalloberflächen, um die Signalstärke zu
maximieren.
*
Montage
Test der wirksamen Reichweite: Drücken Sie einmal die
Rücksetztaste des Zubehörgeräts an dessen gewünschtem
Stando...